One of the many Draw the Squad memes I created in my free time, starring the Dank Meme Warriors.
This year has been an amazing year in Animation. I learned so many things, strengthened so many friendships, and made so many Draw the Squad memes whenever I didn't have work to do. Today, I am going to reflect upon my time in Animation this year and what it was that made it so great.
Valuable Takeaways
My magnum opus, the In My Element animation.
I learned a valuable takeaway from each of eComm's five guarantees: Technology, Collaboration, Communication, Project Management, and Leadership. For Technology, I learned how to use Maya and Adobe AfterEffects, which is important because it taught me an easier way to animate and a way to animate in 3D. I also learned how to use the Burn and Dodge tools in Photoshop and how to trace paper-and-pencil drawings in Photoshop, which I have since used for my digital art. faced many challenges when it came to both; for AfterEffects, when I was working on my In My Element animation, I originally did not know how to extend the time bar for all the frames, which is why Argentia's mouth doesn't match what she is saying. In Maya, I had many challenges when it came to applying textures, but I eventually learned how to do it. In terms of Collaboration, I had to work with others for the final project. Usually, I'm not very good in group projects because I am autistic and have a hard time socializing with people, but in this group project I managed very well. It helped that two of the people in my group were people I already knew and was friends with. I learned that working on something is ten times more fun when someone else is also working on it with you. In terms of Communication, I have learned even more about how to write engaging and professional blog posts such as the one you are reading right now. In terms of Project Management, I have learned to manage my time wisely and complete projects quickly and effectively. In the second quarter alone, I was so effective with my time management that I ended up having enough spare time to create seven different Draw the Squad memes. I made it my goal to make the most of every second. Finally, in terms of Leadership, I learned how to be my own boss and take charge of my own work.
Strengths and Weaknesses
Another animation I'm extremely proud of- this bottle of Falcon Punch!
My greatest strength is my determination. Once I get an idea for a project, nothing can stand in my way. I will make every second count until it is done. Due to my autism, I am notoriously stubborn, but stubbornness goes hand in hand with determination and refusal to give up. This is why I often complete projects so quickly. However, this undying determination is offset by my tendency to be easily distracted if a project is NOT something I would be interested in. However, nowadays, if a project doesn't sound interesting, I still try to complete it to the best of my ability as soon as possible, so I can get it out of the way. My work ethic has improved drastically from when I used to procrastinate all the time, but I still need to work on quality assurance and making sure everything is the best it can be.
How I Will Use This Knowledge
Penny Geld's official portrait for In My Element, made possible thanks to what I have learned!
I will use what I have learned for my own YouTube videos, especiallymy upcoming web series Dank Meme Warriors. In fact, it's thanks to this class teaching me how to trace traditional art and use it in Photoshop that I have abandoned the previous method of "drawing a bunch of things on an app on my phone and putting them in Photoshop to animate them". As stated before, I also have used and will use this knowledge for my drawings and for the sprites in the games I'm making. This includes the official art for my upcoming book series In My Element, as well as the official art and sprites for my upcoming Touhou fan game Touhou Baseball: Gensokyo League. In fact, I have already created some official art for both of these thanks to what I have learned.
My final project for this year, This Is My Seat.
In the end, I have learned so much this year and I can say with 100% certainty that Animation was my favorite class this year. And that's saying something, because Animation beat out Chemistry- a subject that I am passionate about to the point of creating humanized periodic table elements. Overall, while I will miss Mr. Olson, I cannot wait for Animation next year.
Our next project in Maya was to, once again, animate a bunch of balls bouncing. This, time, however, it's in 3D!
So, in Maya, we were asked to make a golf ball, a tennis ball, and a bowling ball, and create bump maps for all of them. For the bowling ball I just used a Blinn, but for the golf and tennis balls, I found bump maps on the internet and used those. We then added 3-point lighting and a floor.
Then, we went down to a near-empty garage in the school and we bounced golf balls, tennis balls, and bowling balls in real life while filming them. Then, we put the videos into Photoshop, and we were tasked to keep track of at which frame the ball bounced up and down and the approximate height of the ball. It was time-consuming. Then, when we were done with writing all that stuff down, we went back to Maya.
In Maya, we animated the balls bouncing by placing keyframes at the exact frames the ball went up or down and then plugging in the numbers we wrote down. After that, we went to the Graph Editor for each one and made the balls' downward descent linear.
After that, we changed the material in the floor to make it match the background, and we added an image background. This was my first time using an image background, and while the shadows can be a little wonky, I'd say it looks good.
In the end, I learned how to use real life to create animations and how to keep track of which keyframes things happen at. I also learned how to use images as backgrounds in Maya.
Recently, we were asked to create a container for a fake product, render it, and animate it. So I knew exactly what I wanted to make: a bottle of Falcon Punch! The first thing we were supposed to do is render the bottle, and I sculpted it from a rotated curve and textured it using a translucent Phong E and a blue Blinn. Then, we were asked to make the label for the product, so I made this:
After creating that, I added a new texture to the yet-untextured portion where I would put the label, and added a picture- this picture- to that texture. After that, I added a brown floor, made the background blue, and added 3-point lighting. Then I rendered an image.
After this, I animated it spinning using keyframes. Then I was done!
From this project, I learned how to add separate textures to separate faces of the same shape and how to put a picture on a texture.
This has been something we have been working on all month. Ironically, it took way longer than it was supposed to due to snow days. But, it's completed, and I am very proud of it. So, allow me to explain the process that went into this.
Step 1: Creating the Snowflakes
The first thing I did was create the snowflakes themselves. I used the Create Polygon tool in Front View to create one half of each individual arm, then mirrored it to create the other half. Then, using Duplicate Special, I created 5 clones of each arm, rotated 60 degrees around, then joined them all together with the Combine tool and deleted their history.
Step 2: Modeling the Snowflakes
The next thing I did was, well, make the snowflakes actually look like snowflakes. First of all, I used the Extrude Face tool to give each snowflake some depth. After this, I hardened the faces using the Soften/Harden Faces tool and smoothed them out with the Smooth tool. By that point, they were fully modeled, so I moved on to...
Step 3: Shading the Snowflakes
After that, I added color, shading, and texture to the snowflakes. I created a Phong E, colored it white, and named it SnowShader. Then I assigned it to all the snowflakes. After that, I added bump mapping (specifically the Rock texture) to make the snowflakes look more like they are made of tiny crystals. Finally, I added white and blue 3-point lighting with a white key light, a blue fill light, and a white back light.
Step 4: Creating the Room
For the room in the animation, I created a polygon plane, then extruded part of it for the window. Then I shaded everything, using a transparent Phong E for the window and Lamberts for everything else. Then, I created a lamp using a point light.
Step 5: Actually Animating the Snowflakes
First of all, I made the snowflakes smaller, then created 2 sets of smaller, farther-away copies. After that, I dragged them up above the window. Then, I used keyframing to set a unique path for each one. Finally, once it was all done, I batch rendered it all, exported it all into After Effects, and arranged it all there. After all this, I was finally done.
What I Learned
I learned how to take a flat object and use the Extrude, Harden Edges, and Smooth tool to make it look realistically 3D. I also learned how to make things look like ice, how to use blue lights to make pure-white things have a slight bluish tint, and how to animate multiple things each going down their own path. This was a very fun project, and I'm especially proud of it.
This project was one of the most complex, elaborate, and anticipated projects we have done in Maya thus far. There were two parts to it: modeling and animating. This was the first time that we animated something in Maya.
First, let me explain how I modeled this. For this project, there was a lot of joining shapes together and applying textures. However, unlike the previous projects, which had fairly basic textures, for this one we used bump mapping. Bump mapping allows your models to appear, well, bumpy, and makes things look more organic as opposed to the artificial smoothness of the lamberts, blinns, and phongs. I used a cloud texture for the ice cream scoops and a leather texture for the cone.
Now, time to explain how I animated this. Basically, I used a cylinder to create a rotating platform for the objects to sit on, and I linked all the objects together so animating it would be less of a hassle. Then I opened the animation timeline and added a keyframe at the beginning. After that, I rotated it, went to the end, and put a keyframe there. Automatically, the platform spun in the animation. Then it exported it as a series of pictures and I put it all together in AfterEffects.
I learned a lot about how to animate in Maya and how to use bump mapping. I am very excited to see what more we will do with this skill!
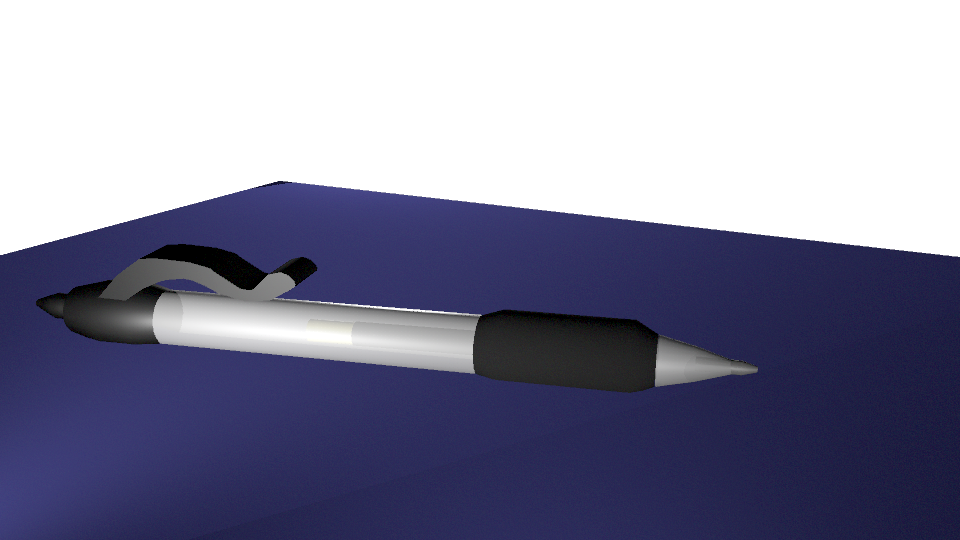
For our final project in Maya, we were asked to make a pen. However, the catch was that we needed to model it after an existing pen and make it as close to the original as possible. For reference, this was the pen I used:
So, we had to use all that we had learned to create a pen. I started off by making a simple cylinder, then adding subdivisions. After that, I went into Vertex Mode and made it so parts of it were more pronounced while the end of it tapered downward. Then I separated the grip and the top of the pen from the rest of the pen. After that, I created the push thing at the top of the pen using another cylinder and Vertex Mode. I then created the clip by drawing a NURBS curve, creating a surface from it, and extruding that surface. My initial plan was to use lofting, but that didn't turn out like I wanted it to. Then, after making the main body of the pen translucent, I added the ink and its container using yet more cylinders, and finally, I made the point of the pen with another cylinder and Vertex Mode. I also added colors and textures to everything- the plastic-like Blinn for most of the pen, the matte Lambert for the grip, and the metallic Phong E for the point. After that, I added lights and a floor, and I was done!
This project was a very exhausting one, but it was quite simple once I got the hang of it. After all this time, I'm proud of how far I've come in Maya. I'm amazed with what I have been able to create in Maya recently, and though I prefer 2D animation, at least I know how to do 3D animation now.
This week, we were assigned to create two things in Maya: a cup and a salt shaker. How did we do this? Simple. Revolving and lofting. Now you might be wondering, "Maddie, what even is revolving and lofting, and what does it entail?" Well, allow me to explain.
Revolving is sort of like making something on a potter's wheel. You start with a simple NURBS curve, then you shape it into what looks like a cross-section of whatever you're going to make. Then you just click Revolve on the Modeling menu and spin it around an axis, and ta-da! You have your object.
Lofting is more akin to building a structure. You start with a NURBS surface and shape it into the base for whatever you are creating, then duplicate it and move the duplicates up until you have it at the height you want. You can also use NURBS surfaces that are differently shaped. Then, once you have the framework for whatever you are creating, you go to the Surfaces menu, click Loft, and voila! You have just successfully lofted.
This week, we were assigned to make a hammer in Maya. Now, I'm not very good with Maya, and the many things that went wrong during this project is a prime example of that. However, it turned out pretty well despite that.
The first thing we had to do was model the hammer. It was easy at first, but once it got to shaping the claw, I encountered a problem- whenever I transformed something, I was doing it to the entire shape. Thankfully, after a quick Google search, I was able to fix it, and I continued onwards, shaping the head of the hammer as well as tapering in the handle.
Next, we had to shade the hammer. Shading was, by far, the easiest part. All I had to do was apply a brown lambert to the handle and apply a shiny metallic texture to the head.
Finally, we had to do 3-point lighting around the hammer. This was, by far, the most difficult part, because no matter what I did with my 3 spotlights, it would be too dark when it rendered. Finally, after hours of experimenting, I managed to use 3 extremely wide and bright lights to make the hammer visible, and after exporting it as a PNG, I turned up the contrast in the color settings on Preview. Overall, I think it turned out pretty good.
Over the following semester, we have been creating several things. Today, we were asked to reflect on our favorites. Here are mine.
1. Walk Animation
In this project, I learned how to shade in Photoshop, and that moving the limbs of characters is a lot harder than one may think. You have to move the opposite arm and leg, alternating between them, and make sure the rhythm of the movement isn't off. I chose this project because I am so extremely proud of how Metal Girl looks. She's fully shaded, anatomically sound, and the metal blades on various parts of her body actually look like metal. Not to mention, this was the first video that I got to incorporate my characters into. I think the best part of this animation was how Metal Girl looks, but the worst part of it is the background, which looks quite out-of-place in comparison to the style of the character. I'm going to use this knowledge of how to make characters walk for my upcoming web series, Dank Meme Warriors. I will also use my new knowledge of how to shade in Photoshop for the official character portraits in my upcoming book series In My Element, among other things. If I were to change anything, I would most definitely use a different background and not just a screenshot from an NES game. In conclusion, I feel like this project showcased how beautiful I can make my characters look and how smoothly I can make them move.
2. Maya Castle
This was our second project using Maya, a 3D modeling software. I learned how to use booleans to make more complicated shapes and how to apply textures to objects. The only reason I chose this project is because we had to choose 2 Maya projects to reflect upon, and one of them is one that I am NOT proud of. I will use what I have learned to make appealing and detailed things in Maya for this class. The best thing about my castle is that it actually turned out decent. Throughout my project, I had no idea how to do a lot of the things due to my terrible memory, so I had to get others to help me on several occasions. However, my castle is a little basic. If there was anything I would change, it would be adding more things to make it stand out. In conclusion, this castle was very difficult, but I am so proud of it.
3. Polything
Going from one Maya project to another, the Polything was our first attempt at using lighting. I learned how to use lighting in Maya, for the most part. I also had some more practice with booleans and making complex shapes. I chose this project because it's the Maya project I'm most proud of. It's so beautiful! I will use what I have learned to make equally beautiful things in Maya. I believe that while I could work on the lighting, the shape and the way the light shines off of it are spectacular. If I could change anything, I'd make the light a little brighter. In conclusion, this is the best thing I've made in Maya thus far.
4. Multiplane Animation
This animation, which I have dubbed "Moonscape" was not only a project that I learned a lot from, but also an opportunity to sneak in references to astronomy, mythology, and pop culture. I learned what a multiplane animation entails, and that the things in the back must be shorter and move slower than the things in the front. I chose this project because I'm proud of not only how it moves, but all the things I was able to sneak in there. The best thing about this animation is the smooth animation, but I do think it could have been shaded more. Again, I will use this skill when making multiplane animations for my upcoming web series Dank Meme Warriors. If I would change anything, I'd take some time to shade everything. Overall, this animation is truly "out of this world".
5. Story Animation
Finally we come to my In My Element Story Animation, which I consider to be my magnum opus. I learned not only how to put audio into an AfterEffects animation, but also how to use the various skills I have learned to create something beautiful. I chose this project because it is the greatest thing I have created in this class- beautiful, quirky, lighthearted, smooth, heartwarming, and educational. The best things about this animation are the character designs and the voice work. However, there were a few slip-ups, such as the beginning when Argentia's mouth movements didn't match up to her lips and when Courtney had to have her mouth covering up a clear spot at all times even when she was talking. If I was to change anything, it would be those slip-ups. I will use everything I have learned here not only for my class, but for my own independent projects. In conclusion, this is the gold standard of my animations, that will lead the way for sodium many good animations. It may be a little silicon, and it could be ironed out a little, but as it is, it shows that for me, animations are serious bismuth.
Thanks for reading this, everyone. See you in 2018!
-Madeline
All of my animation career has led up to this moment.
An animation made by me with an actual plot.
Our final project to conclude our 2D Animation unit was an animation with a story, and from the moment it was announced, I was psyched for this project! As I have stated before, I have a metric ton of characters, both fan characters and completely original ones, so deciding who to use was very difficult. In the end, I settled on characters from my upcoming book series In My Element.In My Element is a series starring humanized versions of periodic table elements who live on a secret island known as Mendelevia, which is concealed from humans. So, now that you understand what the basic gist of the series is, I'll give you a brief rundown of the plot of this animation.
We start at the Central Nucleus Diner, the best (and only) diner in Mendelevia. Carly Buckley, our main character (who represents carbon) works as a waitress there. In the first scene, Carly asks the Geld sisters (who represent the Group 11 metals) what they would like to order, and Argentia Geld (who represents silver) places an extremely specific order. In the next scene, Phoebe Andersen (who represents phosphorus) states that she wants a Coca-Cola. Carly then explains that they only have Pepsi products, but Phoebe threatens Carly with a match and demands a Coke. Then, Courtney Kobold (who represents cobalt) orders 7 plays of What's New Pussycat, then 1 of It's Not Unusual, followed by another 13 of What's New Pussycat (a reference to the John Mulaney skit "The Salt and Pepper Diner). Of course, this makes Carly angry. Later, Carly is walking over to the Halogena family (who represent the halogens) to give them their food, but she trips and drops their food. Flo Halogena (who represents fluorine), the de facto leader of the Halogenas, demands they all attack Carly to get revenge, and they all beat her up. After that madness, Carly goes home, tired and grumpy after all she's been through, only to find that her brother Sidney Buckley (who represents silicon) had heard her day wasn't going well and baked her a cake. And with that, it ends.
I have to say, this went a lot better than I expected. Aside from the occasional animation error, it looks great, and all the characters turned out just like I imagined them. I've learned a lot about how to use AfterEffects to create an animation with a story. I did have to overcome some obstacles- for instance, every time I edited a new scene, I had to extend the length of the layer from 0:15 to 1:54- but it did turn out fine. I learned a lot from this, and this is the first time I've made an animation with a coherent plot, so I looks forward to doing more things like this in the future.
This week in Animation, we made multiplane animations. Multiplane animation is when you use several layers of animation and move them all separately to create a feeling of depth. It was invented in 1957 by Walt Disney, and he did it using a special device called the multiplane camera, which he and his crew invented. Back then, animations were made using transparent celluloid sheets with drawings on them and large glass frames with cameras above them so they could take a picture of each frame. Then they put the frames together to create an animation. It was a long process, and because of this, old animation studios looked like factories because of how many people it took to draw so many frames.
Now, we don't need to do that anymore because we've got computers! My class made our multiplane animation using Photoshop's multiple layers and AfterEffects' instant motion tweening. I put mine on the moon, because I thought that had a lot of creative possibilities. The first thing I did was draw the earth in the background. Most people in my group put the sun there, but since mine is on the moon, I thought the earth would be more fitting. Then, I created 3 layers of a moonscape, all in different shades of gray, and then added craters on each layer. Then, I added details. On the front layer, I added the Moon Rabbit (a white rabbit from Japanese folklore that lives on the moon, making rice cake) and Majora from The Legend of Zelda: Majora's Mask, who lives inside the moon. On the middle layer, I added the American flag from the Apollo 11 (complete with footsteps that will never go away due to the moon having no wind) and Desmond the Moon Bear (from TomSka's "asdfmovie" videos). On the back layer I added a lunar rover and, of course, the one named Sailor Moon! Then I trimmed down the back and middle layers to make them shorter, put them into AfterEffects, and made them move across the screen. And that is how I made my multiplane animation!
Throughout the past 2 weeks, we made a walk cycle animation. Since we weren't skilled enough to make the legs bend, we just didn't bother. Because of this, the instructor recommended we use robots. Now, I have several OCs that are robots, so it was a difficult decision, but I decided to go with Metal Girl, a grumpy and emotional android girl who throws razor blades, is the daughter of Metal Man from Mega Man 2, and is generally Very Edgy™. I sketched her on paper, then drew over it in Photoshop. Also using Photoshop, I separated her arms and legs from the rest of her body, colored her using Metal Man's official art as a base, and shaded her using the Sad Italian- I mean, Burn tool. I worked especially hard on shading the razor blades on her head, shoulders, boots, gloves, and in her hair to make them look metallic. Then, I put Metal Man's stage in the background, put it in AfterEffects, and started animating! The animation went as smoothly as I imagined, and soon enough, I was done.
Most importantly, I learned how to to take a photo of a drawing and draw over it in Photoshop. I also learned how to use the Sad Italian- I mean, Burn tool (no seriously, look at the Burn tool's icon) and how to animate a character walking semi-realistically in AfterEffects.
See why I call it the "Sad Italian" tool?
I think I did best on the character drawing and the actual walking animation. For someone who hasn't shaded digital art before, I find it relatively impressive. And while the walking animation does look like a wind-up doll, that was sort of the intention, since she IS a robot. What I could improve on is giving the background more depth, instead of just using a screenshot from a NES game.
This week was a great one. Why? We got to animate something that wasn't a bouncing ball! YAY! This was our second project this year, and we learned how to use the Puppet Pin tool. So, without further ado, here it is. My inchworm animation.
In this project, we had to create an inchworm and an environment for him to be in using Photoshop, and then make him crawl across the screen using AfterEffects. I made an alien planet covered in thick clouds of gas, some purple grass, and a brightly colored alien worm. The Puppet Pin tool was very easy to get the hang of, and I managed to get it done rather quickly.
I learned how to use the Puppet Pin tool and how to animate something that isn't a bouncing ball. I also learned about subcompositions, parent layers, and how to make shadows.
Overall, I think it turned out nicely! The worm and alien planet both look appealing, the animation is smooth, and the shading looks natural. Overall, I'm happy with how this turned out and am SUPER psyched for the next project- a character walk cycle!
This week in Animation, we worked on our first real project of the year, which was to animate- gasp!- a bouncing ball. As if we didn't haveenough of those already. But this time, we did something a little different than we did the last few times. Instead of animating everything in Photoshop- which is what I have been doing both for school and for the videos I make in my free time- we simply made the layers in Photoshop, then imported everything into AfterEffects and animated it there. Animating in AfterEffects is like animating in Photoshop, but it's a lot smoother. (However, I don't think I'm going to use AfterEffects for my private animations, because a) I don't have it and b) for me, old habits die hard.) Everything was rather simple and moved smoothly, and I enjoyed it.
What did I learn from this? Well, first of all, I learned how to use AfterEffects. AfterEffects was completely alien to me and I had quite a few difficulties trying to figure it out, but in the end, I managed to make something good. I also learned more about squash and stretch as well as how to make something look 3D in Photoshop.
How did it go? Well, I think it went pretty well. I chose to put the ball in a field at night, as opposed to during the day, which led to the use of several dark and subdued colors. These colors created a beautiful contrast with the ball. The movement is fluid as well, and it bounces in an arc like it would in real life. However, if there's one think I could improve on, it's the speed. The ball's bouncing seems a bit slow, so I'll try to make it faster next time.
Yesterday, we studied the history of animation and watched classic cartoons like Steamboat Willie and Gertie the Dinosaur. Today, we were asked to find something historical from animation online and explainits significance. I chose an old Betty Boop short called "Red Hot Mamma".
The short begins with Betty trying to sleep during a snowstorm, but she can't sleep because of how cold it is and decides to make a fire in the fireplace. However, the fireplace ends up making it TOO hot, and the fireplace turns into a portal to hell. Then Betty falls into the portal, and ends up in hell where a group of demons are doing their usual mischievous things. Then she sings a song, and then the devil himself appears and turns up the heat until she's surrounded by fire. Then, the devil and a group of demons surround her. She freezes the demons by literally giving them the cold shoulder, and freezes the devil by giving him a literal icy glare. This ends up freezing over hell, and soon she ends up in her house, with the fire having subsided. She then gets back into bed and throws a bunch of blankets over herself.
This short was clever and fun, and I loved it. The concept is genius and the exaggerated animation and visual puns are very enjoyable. Betty Boop was one of the first cartoon icons to go into more mature territory, which is what led to her popularity and iconic nature. Overall, this short was a joy to watch.
Tuesday, May 23, 2017
4th Quarter Reflection
My 4th quarter project was exhilarating but fun. My group's product was called the Lingua, and it was a microphone that could translate languages accurately and quickly. Usually, it took us a while to get anywhere with our projects, since CERTAIN members of the group were always lollygagging, but we ended up doing them in the end. One of the big challenges I faced was that I was one of 2 people who were trying to take this seriously, and the one who declared himself the so-called leader of our team was always lollygagging and never got any work done. And while I did make very practical animations and designed the logo, things usually would end up devolving into chaos, as shown by how chaotic our commercial was:
However, I learned along the way that marketing something is pretty easy, and making logos is far easier than I thought. I also learned that making a good commercial is difficult, especially when you have 3 different people to work with (and in the case of one of them, working with him was like trying to herd cats). The feedback we were given was simple. While my work was greatly appreciated, others pointed out that our commercial was far too chaotic or something of that nature. Next time, I hope I don't get paired with people whose ideas clash with my own like that. But I guess that's how group projects are. Group projects are like a game of chance: you roll the dice and see who you get. Sometimes, you get a good group, other times, you get a not-so-good group. However, I believe that my work in 4th quarter was quite phenomenal. Here are some examples of things I did:
In this quarter, I was sure to use my time in class well. I made sure to make every minute count. Only when I was done with all that I needed to do did I look at funny pictures online. When I was done early, I'd look back over what I had and see what else I could add. Outside of class, I tend to use Photoshop a lot in order to explore what it can really do, so I can better my skills in this class.
As a student in e-Communications and as an employee, I have many strengths. One of them is my artistic talent and endless fountain of good ideas. I tend to think outside the box and see things more creatively, which helps me with projects like this. My knowledge of technology is another good point, considering my ability to use computers well is important in this class. I maximize my strengths by using them more and more, and that way, I can get better the more I do these things.
Areas I have in need of improvement include my ability to work as a member of a group. Yes, I CAN work with others, but when having to deal with someone like Mr. Lollygagger, I blew my top one too many times. I'm known to be slightly temperamental, and with him being the "leader" of our group and still not doing anything, I got angry to the point of crying at one point. However, my mom said that learning to deal with people like him is normal, and I think I should work on that.
This semester was an exciting semester. What I loved most was the Video Production we learned in Quarter 3, which was unbelievably fun. What I would do differently is fix the system of grouping used for our group project, because while you said you grouped us via our MBTI personalities, we were of completely different MBTI groups. I know that the intent was to have two introverts and two extroverts, but still. I have learned several things in this semester that I am most definitely using in the future, and I hope that next year, I can create more complex animations. As for my final thoughts? Well, in short, I'm glad I chose this 21st Century Program. It's well worth having to change schools for it, and it's definitely better than taking regular classes at East.
Friday, April 7, 2017
Product Project- The First Rotation
DAWN OF THE FIRST ROTATION
3 ROTATIONS REMAIN.
So for the Product Project, we were supposed to come up with a product and advertise it. My group came up with the Lingua, a microphone that could translate things super accurately. We then split up to do our jobs: Riley and Evan did the 3D modeling, Hannah made the website, and I made the animation. So here is what I made.
I put a lot of effort into this. Like, a lot of effort. I spent several days procrastinating and procrastinating but finally it is complete. I now it's cheesy and all, but it's the best I can do.
Friday, December 16, 2016
Web Design: A New Adventure!
My website's home page.
Look familiar?
This week we ventured into the new and undiscovered world of web design. We used Adobe Dreamweaver to create a website where our projects would be showcased. It took about a week to complete. I used my time in class to work on my website- except in the instances where Dreamweaver was not working, in which case I just looked at memes. Speaking of which, the biggest challenge I faced was Dreamweaver itself. At times, it would not cooperate, not allowing me to work on my website. But, that problem was soon worked around.
I have learned how to make websites using Dreamweaver, and also that DREAMWEAVER IS NEVER YOUR FRIEND. IT MAY SEEM LIKE IT'S ON YOUR SIDE BUT IT CAN TURN AGAINST YOU.
Despite this, Dreamweaver is fairly simple. Making a website on Dreamweaver is a piece of cake (provided it's WORKING) and my final outcome was very professional-looking. And since I am downloading the entire Adobe suite onto my laptop at home over break (since I asked for it for Christmas), I will definitely use Dreamweaver for all my website-creating needs.
Maddie's Magnificent Movies!- My 3D House
Welcome to Chateau de Madeline!
Recently we learned how to create houses in SketchUp, a computer program in which you can create 3D animations. I created a white house using 3D shapes and models, and painted it using the textures provided. Then I chose to add some extras. The first thing I did was I included me (the woman with the paint) and my husband (Mettaton). Then I put a cherry tree (my favorite kind of tree) in front of our house. Afterwards I included a dog house, and I put a model of a puppy in there. Then, I started getting nerdy. I made a garden of Fire Flowers (from Super Mario Bros.) on my lawn and had Nepeta Lejion (my favorite character from the webcomic Homestuck) guarding the flowers, or perhaps simply frolicking in the garden. I put Kirby (from the Kirby series of video games) on the back porch, as there was not much there, and finally, I made a koi pond and put Eridan Ampora (also from Homestuck) in it, since in the comic he is a sea-dwelling troll.
I learned how to use SketchUp 3D and how to make 3D models of things using it. I also learned that SketchUp has a vast model database for all your nerdy needs. And lastly, I learned that Eridan Ampora sitting alone in a koi pond is the most glorious thing I have ever created.
What can I take away for next time? Well, I now know how to build structures in SketchUp, as well as how to inhabit them with Homestuck characters. This was a very fun project!
Thursday, November 17, 2016
Maddie's Magnificent Movies!- 10 Words Animation
This week we made our 10-word animations. We were supposed to use timelines and keyframes to make our words fly in. I chose some of the words from my 10 words that you can see on the side, but some of the words were not included among those 10 (such as "imagination" and "gamer"). I also was supposed to choose a background photo, and I decided on a space background because I love outer space.
This was the first time we were supposed to use the timeline format instead of frames, and it worked well. I learned about keyframes and how to use them as well as how to make things fly in without doing every last frame.
Next time I will continue to use the skills that I learned here, and perhaps make them not fly in so quickly. All in all, I'm glad with how this turned out.