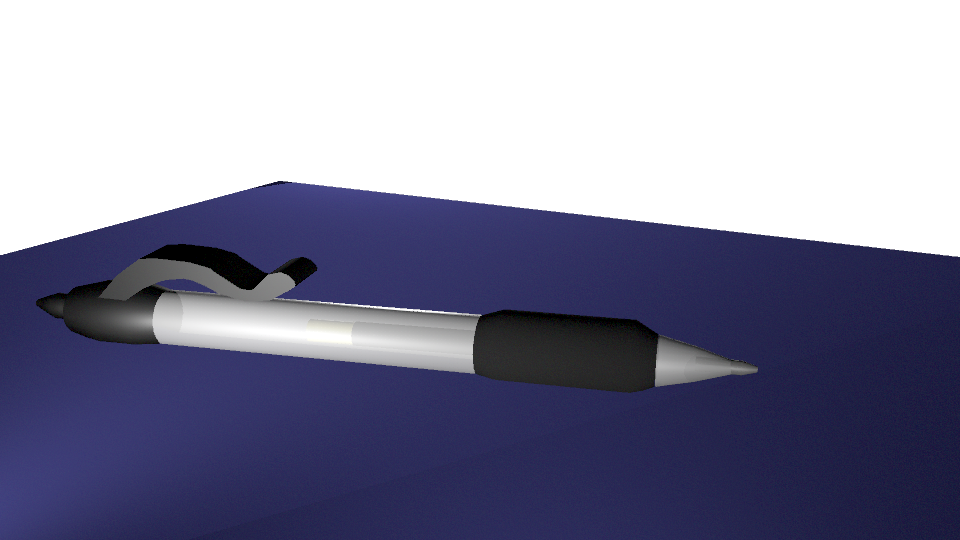
For our final project in Maya, we were asked to make a pen. However, the catch was that we needed to model it after an existing pen and make it as close to the original as possible. For reference, this was the pen I used:
So, we had to use all that we had learned to create a pen. I started off by making a simple cylinder, then adding subdivisions. After that, I went into Vertex Mode and made it so parts of it were more pronounced while the end of it tapered downward. Then I separated the grip and the top of the pen from the rest of the pen. After that, I created the push thing at the top of the pen using another cylinder and Vertex Mode. I then created the clip by drawing a NURBS curve, creating a surface from it, and extruding that surface. My initial plan was to use lofting, but that didn't turn out like I wanted it to. Then, after making the main body of the pen translucent, I added the ink and its container using yet more cylinders, and finally, I made the point of the pen with another cylinder and Vertex Mode. I also added colors and textures to everything- the plastic-like Blinn for most of the pen, the matte Lambert for the grip, and the metallic Phong E for the point. After that, I added lights and a floor, and I was done!
This project was a very exhausting one, but it was quite simple once I got the hang of it. After all this time, I'm proud of how far I've come in Maya. I'm amazed with what I have been able to create in Maya recently, and though I prefer 2D animation, at least I know how to do 3D animation now.
This week, we were assigned to create two things in Maya: a cup and a salt shaker. How did we do this? Simple. Revolving and lofting. Now you might be wondering, "Maddie, what even is revolving and lofting, and what does it entail?" Well, allow me to explain.
Revolving is sort of like making something on a potter's wheel. You start with a simple NURBS curve, then you shape it into what looks like a cross-section of whatever you're going to make. Then you just click Revolve on the Modeling menu and spin it around an axis, and ta-da! You have your object.
Lofting is more akin to building a structure. You start with a NURBS surface and shape it into the base for whatever you are creating, then duplicate it and move the duplicates up until you have it at the height you want. You can also use NURBS surfaces that are differently shaped. Then, once you have the framework for whatever you are creating, you go to the Surfaces menu, click Loft, and voila! You have just successfully lofted.
This week, we were assigned to make a hammer in Maya. Now, I'm not very good with Maya, and the many things that went wrong during this project is a prime example of that. However, it turned out pretty well despite that.
The first thing we had to do was model the hammer. It was easy at first, but once it got to shaping the claw, I encountered a problem- whenever I transformed something, I was doing it to the entire shape. Thankfully, after a quick Google search, I was able to fix it, and I continued onwards, shaping the head of the hammer as well as tapering in the handle.
Next, we had to shade the hammer. Shading was, by far, the easiest part. All I had to do was apply a brown lambert to the handle and apply a shiny metallic texture to the head.
Finally, we had to do 3-point lighting around the hammer. This was, by far, the most difficult part, because no matter what I did with my 3 spotlights, it would be too dark when it rendered. Finally, after hours of experimenting, I managed to use 3 extremely wide and bright lights to make the hammer visible, and after exporting it as a PNG, I turned up the contrast in the color settings on Preview. Overall, I think it turned out pretty good.
Over the following semester, we have been creating several things. Today, we were asked to reflect on our favorites. Here are mine.
1. Walk Animation
In this project, I learned how to shade in Photoshop, and that moving the limbs of characters is a lot harder than one may think. You have to move the opposite arm and leg, alternating between them, and make sure the rhythm of the movement isn't off. I chose this project because I am so extremely proud of how Metal Girl looks. She's fully shaded, anatomically sound, and the metal blades on various parts of her body actually look like metal. Not to mention, this was the first video that I got to incorporate my characters into. I think the best part of this animation was how Metal Girl looks, but the worst part of it is the background, which looks quite out-of-place in comparison to the style of the character. I'm going to use this knowledge of how to make characters walk for my upcoming web series, Dank Meme Warriors. I will also use my new knowledge of how to shade in Photoshop for the official character portraits in my upcoming book series In My Element, among other things. If I were to change anything, I would most definitely use a different background and not just a screenshot from an NES game. In conclusion, I feel like this project showcased how beautiful I can make my characters look and how smoothly I can make them move.
2. Maya Castle
This was our second project using Maya, a 3D modeling software. I learned how to use booleans to make more complicated shapes and how to apply textures to objects. The only reason I chose this project is because we had to choose 2 Maya projects to reflect upon, and one of them is one that I am NOT proud of. I will use what I have learned to make appealing and detailed things in Maya for this class. The best thing about my castle is that it actually turned out decent. Throughout my project, I had no idea how to do a lot of the things due to my terrible memory, so I had to get others to help me on several occasions. However, my castle is a little basic. If there was anything I would change, it would be adding more things to make it stand out. In conclusion, this castle was very difficult, but I am so proud of it.
3. Polything
Going from one Maya project to another, the Polything was our first attempt at using lighting. I learned how to use lighting in Maya, for the most part. I also had some more practice with booleans and making complex shapes. I chose this project because it's the Maya project I'm most proud of. It's so beautiful! I will use what I have learned to make equally beautiful things in Maya. I believe that while I could work on the lighting, the shape and the way the light shines off of it are spectacular. If I could change anything, I'd make the light a little brighter. In conclusion, this is the best thing I've made in Maya thus far.
4. Multiplane Animation
This animation, which I have dubbed "Moonscape" was not only a project that I learned a lot from, but also an opportunity to sneak in references to astronomy, mythology, and pop culture. I learned what a multiplane animation entails, and that the things in the back must be shorter and move slower than the things in the front. I chose this project because I'm proud of not only how it moves, but all the things I was able to sneak in there. The best thing about this animation is the smooth animation, but I do think it could have been shaded more. Again, I will use this skill when making multiplane animations for my upcoming web series Dank Meme Warriors. If I would change anything, I'd take some time to shade everything. Overall, this animation is truly "out of this world".
5. Story Animation
Finally we come to my In My Element Story Animation, which I consider to be my magnum opus. I learned not only how to put audio into an AfterEffects animation, but also how to use the various skills I have learned to create something beautiful. I chose this project because it is the greatest thing I have created in this class- beautiful, quirky, lighthearted, smooth, heartwarming, and educational. The best things about this animation are the character designs and the voice work. However, there were a few slip-ups, such as the beginning when Argentia's mouth movements didn't match up to her lips and when Courtney had to have her mouth covering up a clear spot at all times even when she was talking. If I was to change anything, it would be those slip-ups. I will use everything I have learned here not only for my class, but for my own independent projects. In conclusion, this is the gold standard of my animations, that will lead the way for sodium many good animations. It may be a little silicon, and it could be ironed out a little, but as it is, it shows that for me, animations are serious bismuth.
Thanks for reading this, everyone. See you in 2018!
-Madeline
For our final video project of 2017, we were asked to create an ONW Now news segment with other kids in our class. I was one of the two news anchors, the other one being my best friend. I also was asked to do a story about the underclassman play.
The story about the underclassman play wasn't all mine- my best friend helped out. I gave her questions to ask the director as well as information about the underclassman play, and I also helped her get B-roll. At first, I thought that the day she got B-roll would be a day where everyone came, however, I read the schedule wrong, and I wasn't needed that day. I came anyway to see if my friend would get her B-roll, but later she said that I should "go home, do something productive, and pet a dog". So I went home. Later on, I acquired more responsibilities as the anchor.
I learned, for the most part, what being a news anchor entails. It's harder than it looks- you have to smile and speak clearly all while stating the information and looking respectable. I also learned that getting B-roll of a play is easier said than done, especially when you're using the Cursed Tripod.
Next time, I should give myself more work to do, as I believed I didn't have enough to do in this project. Nevertheless, I enjoyed this project and can't wait for Entertainment next semester!
All of my animation career has led up to this moment.
An animation made by me with an actual plot.
Our final project to conclude our 2D Animation unit was an animation with a story, and from the moment it was announced, I was psyched for this project! As I have stated before, I have a metric ton of characters, both fan characters and completely original ones, so deciding who to use was very difficult. In the end, I settled on characters from my upcoming book series In My Element.In My Element is a series starring humanized versions of periodic table elements who live on a secret island known as Mendelevia, which is concealed from humans. So, now that you understand what the basic gist of the series is, I'll give you a brief rundown of the plot of this animation.
We start at the Central Nucleus Diner, the best (and only) diner in Mendelevia. Carly Buckley, our main character (who represents carbon) works as a waitress there. In the first scene, Carly asks the Geld sisters (who represent the Group 11 metals) what they would like to order, and Argentia Geld (who represents silver) places an extremely specific order. In the next scene, Phoebe Andersen (who represents phosphorus) states that she wants a Coca-Cola. Carly then explains that they only have Pepsi products, but Phoebe threatens Carly with a match and demands a Coke. Then, Courtney Kobold (who represents cobalt) orders 7 plays of What's New Pussycat, then 1 of It's Not Unusual, followed by another 13 of What's New Pussycat (a reference to the John Mulaney skit "The Salt and Pepper Diner). Of course, this makes Carly angry. Later, Carly is walking over to the Halogena family (who represent the halogens) to give them their food, but she trips and drops their food. Flo Halogena (who represents fluorine), the de facto leader of the Halogenas, demands they all attack Carly to get revenge, and they all beat her up. After that madness, Carly goes home, tired and grumpy after all she's been through, only to find that her brother Sidney Buckley (who represents silicon) had heard her day wasn't going well and baked her a cake. And with that, it ends.
I have to say, this went a lot better than I expected. Aside from the occasional animation error, it looks great, and all the characters turned out just like I imagined them. I've learned a lot about how to use AfterEffects to create an animation with a story. I did have to overcome some obstacles- for instance, every time I edited a new scene, I had to extend the length of the layer from 0:15 to 1:54- but it did turn out fine. I learned a lot from this, and this is the first time I've made an animation with a coherent plot, so I looks forward to doing more things like this in the future.
Now, I had to work with a team to create this video, and my best friend Tate and I worked together to make this. Our group decided to do our feature story on the French class and the Paris trip, and I went along with it even though I wasn't in French. The first thing we did was we went down to the French room to film some B-roll, which was pretty alright. Then, Tate and I put the B-roll and the video footage together. Tate then recorded narration.
I have to say we did pretty well with this. While this isn't our best work, it's not our worst, either. We could have done better with balancing out the audio, however.