Tuesday, May 22, 2018

End of Year Reflection

One of the many Draw the Squad memes I created in my free time, starring the Dank Meme Warriors.
This year has been an amazing year in Animation. I learned so many things, strengthened so many friendships, and made so many Draw the Squad memes whenever I didn't have work to do. Today, I am going to reflect upon my time in Animation this year and what it was that made it so great.

Valuable Takeaways


My magnum opus, the In My Element animation.

I learned a valuable takeaway from each of eComm's five guarantees: Technology, Collaboration, Communication, Project Management, and Leadership. For Technology, I learned how to use Maya and Adobe AfterEffects, which is important because it taught me an easier way to animate and a way to animate in 3D. I also learned how to use the Burn and Dodge tools in Photoshop and how to trace paper-and-pencil drawings in Photoshop, which I have since used for my digital art.  faced many challenges when it came to both; for AfterEffects, when I was working on my In My Element animation, I originally did not know how to extend the time bar for all the frames, which is why Argentia's mouth doesn't match what she is saying. In Maya, I had many challenges when it came to applying textures, but I eventually learned how to do it. In terms of Collaboration, I had to work with others for the final project. Usually, I'm not very good in group projects because I am autistic and have a hard time socializing with people, but in this group project I managed very well. It helped that two of the people in my group were people I already knew and was friends with. I learned that working on something is ten times more fun when someone else is also working on it with you. In terms of Communication, I have learned even more about how to write engaging and professional blog posts such as the one you are reading right now. In terms of Project Management, I have learned to manage my time wisely and complete projects quickly and effectively. In the second quarter alone, I was so effective with my time management that I ended up having enough spare time to create seven different Draw the Squad memes. I made it my goal to make the most of every second. Finally, in terms of Leadership, I learned how to be my own boss and take charge of my own work. 

Strengths and Weaknesses

Another animation I'm extremely proud of- this bottle of Falcon Punch!

My greatest strength is my determination. Once I get an idea for a project, nothing can stand in my way. I will make every second count until it is done. Due to my autism, I am notoriously stubborn, but stubbornness goes hand in hand with determination and refusal to give up. This is why I often complete projects so quickly. However, this undying determination is offset by my tendency to be easily distracted if a project is NOT something I would be interested in. However, nowadays, if a project doesn't sound interesting, I still try to complete it to the best of my ability as soon as possible, so I can get it out of the way. My work ethic has improved drastically from when I used to procrastinate all the time, but I still need to work on quality assurance and making sure everything is the best it can be. 

How I Will Use This Knowledge
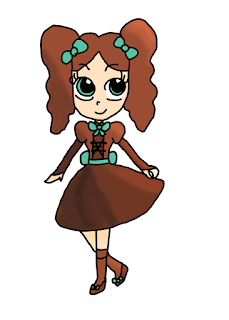
Penny Geld's official portrait for In My Element, made possible thanks to what I have learned!
 I will use what I have learned for my own YouTube videos, especially my upcoming web series Dank Meme Warriors. In fact, it's thanks to this class teaching me how to trace traditional art and use it in Photoshop that I have abandoned the previous method of "drawing a bunch of things on an app on my phone and putting them in Photoshop to animate them". As stated before, I also have used and will use this knowledge for my drawings and for the sprites in the games I'm making. This includes the official art for my upcoming book series In My Element, as well as the official art and sprites for my upcoming Touhou fan game Touhou Baseball: Gensokyo League. In fact, I have already created some official art for both of these thanks to what I have learned.

My final project for this year, This Is My Seat.

In the end, I have learned so much this year and I can say with 100% certainty that Animation was my favorite class this year. And that's saying something, because Animation beat out Chemistry- a subject that I am passionate about to the point of creating humanized periodic table elements. Overall, while I will miss Mr. Olson, I cannot wait for Animation next year.

Friday, April 6, 2018

Maddie's Magnificent Movies!- Yet Another Bouncing Ball Animation


Our next project in Maya was to, once again, animate a bunch of balls bouncing. This, time, however, it's in 3D! 

So, in Maya, we were asked to make a golf ball, a tennis ball, and a bowling ball, and create bump maps for all of them. For the bowling ball I just used a Blinn, but for the golf and tennis balls, I found bump maps on the internet and used those. We then added 3-point lighting and a floor.

Then, we went down to a near-empty garage in the school and we bounced golf balls, tennis balls, and bowling balls in real life while filming them. Then, we put the videos into Photoshop, and we were tasked to keep track of at which frame the ball bounced up and down and the approximate height of the ball. It was time-consuming. Then, when we were done with writing all that stuff down, we went back to Maya.

In Maya, we animated the balls bouncing by placing keyframes at the exact frames the ball went up or down and then plugging in the numbers we wrote down. After that, we went to the Graph Editor for each one and made the balls' downward descent linear.

After that, we changed the material in the floor to make it match the background, and we added an image background. This was my first time using an image background, and while the shadows can be a little wonky, I'd say it looks good.

In the end, I learned how to use real life to create animations and how to keep track of which keyframes things happen at. I also learned how to use images as backgrounds in Maya.

Monday, March 26, 2018

Maddie's Magnificent Movies!- FALCON PUNCH!


Recently, we were asked to create a container for a fake product, render it, and animate it. So I knew exactly what I wanted to make: a bottle of Falcon Punch! The first thing we were supposed to do is render the bottle, and I sculpted it from a rotated curve and textured it using a translucent Phong E and a blue Blinn. Then, we were asked to make the label for the product, so I made this:


After creating that, I added a new texture to the yet-untextured portion where I would put the label, and added a picture- this picture- to that texture. After that, I added a brown floor, made the background blue, and added 3-point lighting. Then I rendered an image.

After this, I animated it spinning using keyframes. Then I was done!

From this project, I learned how to add separate textures to separate faces of the same shape and how to put a picture on a texture.

Maddie's Magnificent Movies!- Napoleon Dynamite Trailer Recreation


In Video Production, we were asked to recreate a movie trailer (more or less) shot-for-shot. We could only really use movies that were grounded in reality, since we didn't have the budget for stunts or enhanced CGI effects. So, my group did Napoleon Dynamite.

Making storyboards was a far quicker process this time, since it was all online and using screenshots from the trailer as opposed to having it all be drawn out by hand. However, I wasn't the one making the storyboards- I was the director. The three people in my group (myself included) played all the parts ourselves- Seth was Napoleon, I was Trisha, and Tate was everyone else. (I was also Pedro's stunt double, as Tate was Napoleon's stunt double.) I also provided the picture of the liger and filmed all shots with both Napoleon and Pedro.

Filming was a very fun process. We first filmed the scenes at school, which is where I did all of my acting, including me judgementally eating Goldfish crackers and asking Napoleon what a liger is. Then we had to film at Tate's house, and that was really fun. The first time we filmed at Tate's, we broke our microphone and could only film scenes with no dialogue for the rest of the day, but the second time, we had a new microphone and didn't break ours.

After all was said and done, we all had to edit our own trailers. Editing my trailer was pretty easy, and there were no major obstacles I had to overcome.

I learned how to make a movie trailer, how to judgementally eat Goldfish, how to draw an anime liger, and what to do when you break a microphone. Overall, I would say my trailer turned out great!

Thursday, March 1, 2018

Maddie's Magnificent Movies!- Snowflake Animation


This has been something we have been working on all month. Ironically, it took way longer than it was supposed to due to snow days. But, it's completed, and I am very proud of it. So, allow me to explain the process that went into this.

Step 1: Creating the Snowflakes


The first thing I did was create the snowflakes themselves. I used the Create Polygon tool in Front View to create one half of each individual arm, then mirrored it to create the other half. Then, using Duplicate Special, I created 5 clones of each arm, rotated 60 degrees around, then joined them all together with the Combine tool and deleted their history.


Step 2: Modeling the Snowflakes

The next thing I did was, well, make the snowflakes actually look like snowflakes. First of all, I used the Extrude Face tool to give each snowflake some depth. After this, I hardened the faces using the Soften/Harden Faces tool and smoothed them out with the Smooth tool. By that point, they were fully modeled, so I moved on to...

Step 3: Shading the Snowflakes

After that, I added color, shading, and texture to the snowflakes. I created a Phong E, colored it white, and named it SnowShader. Then I assigned it to all the snowflakes. After that, I added bump mapping (specifically the Rock texture) to make the snowflakes look more like they are made of tiny crystals. Finally, I added white and blue 3-point lighting with a white key light, a blue fill light, and a white back light. 

Step 4: Creating the Room

For the room in the animation, I created a polygon plane, then extruded part of it for the window. Then I shaded everything, using a transparent Phong E for the window and Lamberts for everything else. Then, I created a lamp using a point light.

Step 5: Actually Animating the Snowflakes

First of all, I made the snowflakes smaller, then created 2 sets of smaller, farther-away copies. After that, I dragged them up above the window. Then, I used keyframing to set a unique path for each one.  Finally, once it was all done, I batch rendered it all, exported it all into After Effects, and arranged it all there. After all this, I was finally done.

What I Learned

I learned how to take a flat object and use the Extrude, Harden Edges, and Smooth tool to make it look realistically 3D. I also learned how to make things look like ice, how to use blue lights to make pure-white things have a slight bluish tint, and how to animate multiple things each going down their own path. This was a very fun project, and I'm especially proud of it.

Tuesday, February 13, 2018

Maddie's Magnificent Movies!- Ice Cream Project


I'm animating my favorite food! YEET!

This project was one of the most complex, elaborate, and anticipated projects we have done in Maya thus far. There were two parts to it: modeling and animating. This was the first time that we animated something in Maya.

First, let me explain how I modeled this. For this project, there was a lot of joining shapes together and applying textures. However, unlike the previous projects, which had fairly basic textures, for this one we used bump mapping. Bump mapping allows your models to appear, well, bumpy, and makes things look more organic as opposed to the artificial smoothness of the lamberts, blinns, and phongs. I used a cloud texture for the ice cream scoops and a leather texture for the cone.

Now, time to explain how I animated this. Basically, I used a cylinder to create a rotating platform for the objects to sit on, and I linked all the objects together so animating it would be less of a hassle. Then I opened the animation timeline and added a keyframe at the beginning. After that, I rotated it, went to the end, and put a keyframe there. Automatically, the platform spun in the animation. Then it exported it as a series of pictures and I put it all together in AfterEffects.

I learned a lot about how to animate in Maya and how to use bump mapping. I am very excited to see what more we will do with this skill!

Wednesday, February 7, 2018

Maddie's Magnificent Movies!- Music Video Project (Party in the USA)


So, for Video Production, we had to make a music video. We got to choose our own groups,and me, my best friend, and some other kid were in high demand due to our artistic abilities. As a result, I 
ended up with 3 people who were casual acquaintances of mine at best. I secretly wanted to do a 
J-pop song, but I knew they would never go for it, so we settled on “Party in the USA” by Miley 
Cyrus. I was tasked with drawing all the storyboards, which was exhausting work, but I managed to 
do it and make it look good. There was also a day where we filmed, but I was not present for that. 
However, I was present for the green-screen filming, and I even managed to dance in it. I essentially 
learned how to make a music video. At one point, I did have an app called VideoStar that I used to 
make music videos, but I wasn’t very good at it due to me recording everything with my phone. 
However, this was my first experience with making a real music video with professional equipment. This was also my first experience with green-screens, a tool I will use in the future without a doubt. I had a lot of fun with this, and I’m looking forward to our next video project- a movie trailer!